How to mount an LCD module?
Leave a message
As an LCD module supplier, I often receive inquiries from customers about how to mount an LCD module. In this blog post, I'll share some comprehensive guidance on this topic, covering various aspects from preparation to the actual mounting process.
Preparation
Before you start mounting an LCD module, it's crucial to make thorough preparations. First, gather all the necessary tools. You'll typically need a soldering iron if your LCD module requires soldering connections. Make sure the soldering iron has a suitable tip size and is set to the appropriate temperature. A multimeter is also essential for checking electrical connections and ensuring there are no short - circuits. Additionally, have a pair of tweezers on hand for handling small components and a screwdriver if the module needs to be secured with screws.
Next, carefully review the datasheet of the LCD module. The datasheet contains vital information such as the pinout diagram, electrical characteristics, and recommended operating conditions. Understanding these details will help you avoid making costly mistakes during the mounting process. For example, some LCD modules may have specific voltage requirements, and exceeding these limits can damage the module.
Types of LCD Modules and Their Mounting Considerations
There are different types of LCD modules available in the market, each with its own mounting requirements. Let's take a look at some common ones.
Segment LCD Module
The Segment LCD Module is a simple and widely used type. It usually displays numbers, symbols, or simple graphics. When mounting a segment LCD module, pay close attention to the connection of the segments. These connections are often made through a flexible printed circuit (FPC) or pins. If using an FPC, ensure that it is properly aligned with the connector on the PCB (Printed Circuit Board). Make sure there are no wrinkles or bends in the FPC that could cause poor electrical contact. When soldering pins, use the right amount of solder to avoid short - circuits between adjacent pins.
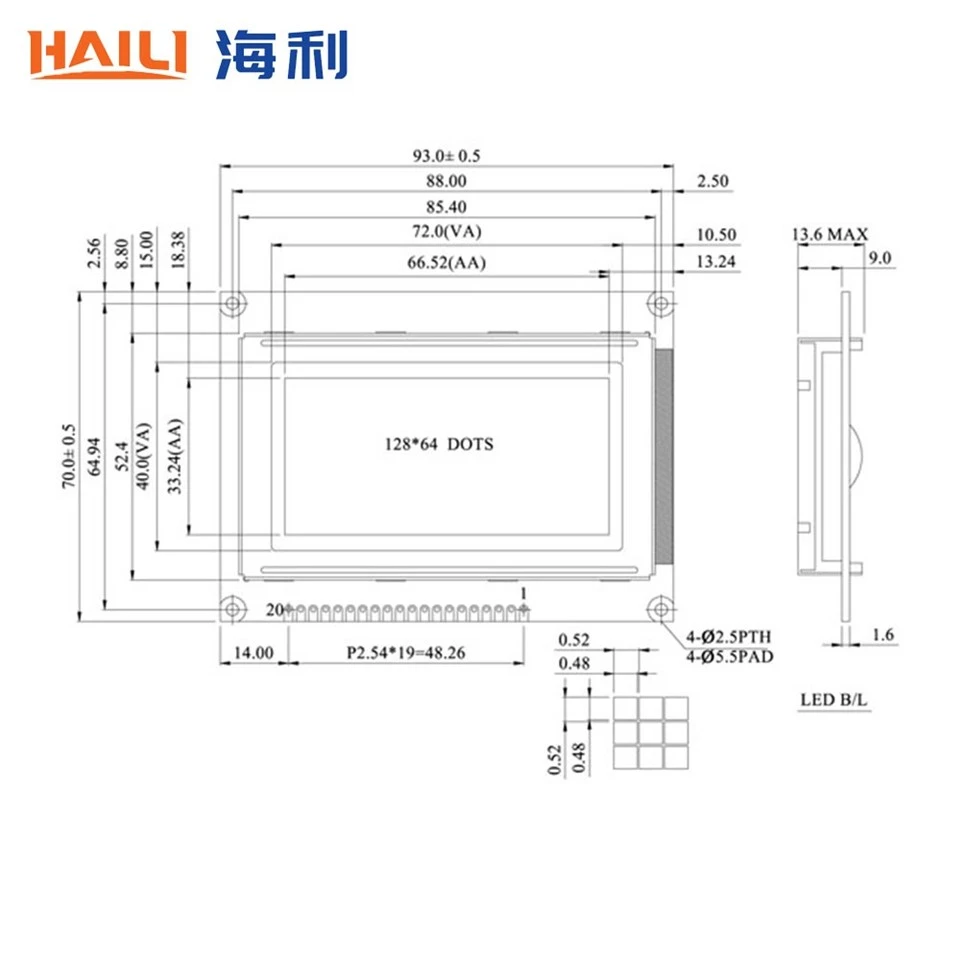
12864 Character LCD Module
The 12864 Character LCD Module is capable of displaying more complex characters and simple graphics. This module often has a larger number of pins, which means more careful handling during mounting. Check the pinout diagram to correctly identify the power, ground, data, and control pins. When soldering these pins, it's advisable to start with the corner pins first to align the module properly on the PCB. Then, solder the remaining pins one by one, applying gentle pressure to ensure a good connection.
8x2 Character LCD Module
The 8x2 Character LCD Module is a relatively small and simple module, mainly used for displaying short text messages. Mounting this module is relatively straightforward. However, you still need to be careful with the power and ground connections. A wrong connection in these pins can lead to the module not working at all or even getting damaged. When soldering, make sure the solder joints are clean and smooth to prevent any signal interference.
Mounting Process
Step 1: PCB Preparation
Clean the PCB thoroughly to remove any dust, debris, or oxidation. This can be done using a PCB cleaner or isopropyl alcohol. Check the PCB for any damaged traces or pads. If there are any issues, repair them before proceeding. Mark the position where the LCD module will be mounted on the PCB according to the module's dimensions.
Step 2: Module Placement
Carefully place the LCD module on the marked position on the PCB. If the module has alignment holes, use them to ensure accurate placement. Make sure the pins of the module are aligned with the corresponding pads on the PCB. If necessary, use tweezers to adjust the position of the module slightly.
Step 3: Soldering (if required)
If your LCD module needs to be soldered to the PCB, heat the soldering iron to the appropriate temperature. Touch the tip of the soldering iron to the pad on the PCB and then apply a small amount of solder. The solder should flow smoothly onto the pad. Then, place the pin of the LCD module on the soldered pad and heat the pin with the soldering iron. Add a little more solder to form a good connection between the pin and the pad. Repeat this process for all the pins, taking care not to overheat the module.

Step 4: Testing
After soldering, let the PCB cool down completely. Then, use a multimeter to check the electrical connections. Measure the resistance between different pins to ensure there are no short - circuits. Connect the power supply to the PCB and power on the LCD module. Check if the module displays the expected content. If there are any issues, double - check the connections and refer to the datasheet for troubleshooting.
Mounting in Different Environments
The environment in which the LCD module will be used also affects the mounting process. If the module will be used in a high - humidity environment, it's important to use moisture - resistant materials for mounting. For example, you can apply a conformal coating to the PCB to protect the soldered connections from moisture.
In a high - vibration environment, such as in a vehicle, additional mechanical support may be required. You can use screws or brackets to secure the LCD module more firmly to the PCB or the housing. This will prevent the module from getting loose due to vibrations, which could lead to poor electrical contact or even damage to the module.
Tips for Successful Mounting
- Take your time: Mounting an LCD module requires patience. Rushing through the process can lead to mistakes, such as misaligned pins or poor soldering.
- Use proper lighting: Good lighting is essential for accurately aligning the module and soldering the pins. A well - lit workspace will help you avoid making errors.
- Keep the workspace clean: A clean workspace reduces the risk of dust and debris getting into the module or interfering with the soldering process.
Conclusion
Mounting an LCD module is a process that requires careful planning, proper tools, and attention to detail. By following the steps and tips outlined in this blog post, you can ensure a successful mounting process. Whether you're using a Segment LCD Module, 12864 Character LCD Module, or 8x2 Character LCD Module, understanding the specific requirements of each type is crucial.
If you're in need of high - quality LCD modules for your projects, we are here to assist you. Our company offers a wide range of LCD modules with excellent performance and reliability. We are more than happy to discuss your specific needs and provide you with the best solutions. Contact us for more information and let's start a fruitful cooperation.
References
- Various LCD module datasheets provided by manufacturers.
- Electronics textbooks on PCB assembly and component mounting.


